起因
使用Hexo构建我的博客网站,感觉功能丰富、插件齐全,使用的不能再爽。
但是我开始把我以前的新浪博客帖子搬家,就不美了。我就搬了自己原创的部分,总共六百多个帖子,总是内存溢出。
<--- Last few GCs --->

17611169 ms: Mark-sweep 1389.3 (1404.7) -> 1388.2 (1406.7) MB, 529.2 / 0.0 ms [allocation failure] [GC in old space requested].
17611746 ms: Mark-sweep 1388.2 (1406.7) -> 1388.2 (1406.7) MB, 577.3 / 0.0 ms [allocation failure] [GC in old space requested].
17612313 ms: Mark-sweep 1388.2 (1406.7) -> 1395.2 (1403.7) MB, 566.6 / 0.0 ms [last resort gc].
17612859 ms: Mark-sweep 1395.2 (1403.7) -> 1402.0 (1403.7) MB, 545.6 / 0.0 ms [last resort gc].

<--- JS stacktrace --->

==== JS stack trace =========================================

Security context: 0000017558DCFB61 <JS Object>
    1: charAt [native string.js:~42] [pc=000000875B941596] (this=0000032AB82E7A79 <Very long string[115368]>,t=0)
    2: _parse [C:\Users\scnydq\blog\node_modules\htmlparser2\lib\Tokenizer.js:~632] [pc=000000875B95A279] (this=000002668E5C0EF9 <a Tokenizer with map 000001917B7FC0E1>)
    3: write [C:\Users\scnydq\blog\node_modules\htmlparser2\lib\Tokenizer.js:~625] [pc=000000876843955C] (this=...

FATAL ERROR: CALL_AND_RETRY_LAST Allocation failed - JavaScript heap out of memory
查阅了下面的帖子:
- Hexo Troubleshooting - Process Out of Memory
- OutOfMemory with 3000 docs
- how to use hexo generate more than 1000+ posts
对C:\users\mryqu\AppData\Roaming\npm\node_modules\hexo-cli\bin\hexo进行如下设置,还是不顶:
#!/usr/bin/env node --max_old_space_size=20480 --optimize_for_size --max_executable_size=20480 --stack_size=20480

'use strict';

require('../lib/hexo')();
好吧,Node实现的博客工具我就不碰了。,我是写的GoLang程序从新浪下载我的博文并转化成Markdown文件的,所以这次就挑个GoLang实现的、号称最快的博客工具Hugo。
Hugo是由前Docker的重量级员工(2015年8月末从Docker离职) Steve Francia 实现的一个开源静态站点生成工具框架,类似于Jekyll、Octopress或Hexo,都是将特定格式(最常见的是Markdown格式)的文本文件转换为静态html文件而生成一个静态站点。在这些工具中,Hugo算是后起之秀了,它最大的优点就是Fast! 一个中等规模的站点在几分之一秒内就可以生成出来。其次是良好的跨平台特性、配置简单、使用方便等。这一切均源于其良好的基因:采用Go语言实现。Steve Francia除了Hugo平台自身外,还维护了一个Hugo Theme 的仓库,这个Hugo主题库可以帮助Hugo使用者快速找到自己心仪的主题并快速搭建起静态站点。
安装Hugo
Hugo的安装方式有两种,一种是直接下载编译好的Hugo二进制文件。如果只是使用Hugo推荐用这种方式。另一种方式是获取Hugo的源码,自己编译。
Hugo二进制下载地址:https://github.com/spf13/hugo/releases
这里我直接下载了最新的0.52 Hugo二进制文件。
C:\temp>hugo new site blog
Congratulations! Your new Hugo site is created in C:\temp\blog.

Just a few more steps and you're ready to go:

1. Download a theme into the same-named folder.
   Choose a theme from https://themes.gohugo.io/, or
   create your own with the "hugo new theme <THEMENAME>" command.
2. Perhaps you want to add some content. You can add single files
   with "hugo new <SECTIONNAME>\<FILENAME>.<FORMAT>".
3. Start the built-in live server via "hugo server".

Visit https://gohugo.io/ for quickstart guide and full documentation.

C:\temp>dir blog
 Directory of C:\temp\blog

12/13/2018  08:04 PM    <DIR>          .
12/13/2018  08:04 PM    <DIR>          ..
12/13/2018  08:04 PM    <DIR>          archetypes
12/13/2018  08:04 PM                82 config.toml
12/13/2018  08:04 PM    <DIR>          content
12/13/2018  08:04 PM    <DIR>          data
12/13/2018  08:04 PM    <DIR>          layouts
12/13/2018  08:04 PM    <DIR>          static
12/13/2018  08:04 PM    <DIR>          themes
               1 File(s)             82 bytes
               8 Dir(s)  62,302,044,160 bytes free
选择主题
在https://themes.gohugo.io/ 上浏览各种Hugo的主题后,结果还是喜欢hexo-theme-next 那样的主题。
继续搜索,找到了两款hugo-theme-next,分别是xtfly/hugo-theme-next 和leopku/hugo-theme-next 。
前一款跟hexo-theme-next 更像,GitHub Star也更多。试用了一下,前款可以使用,但是也有不足。
就在GitHub上fork出自己的mryqu/hugo-theme-next ,进行再次开发。
.Next and .Prev are deprecated
我用的是Hugo 0.52,所以出现“.Next and .Prev are deprecated”提示,在layouts/partials/post/prenext.html文件中将“.Next”替换为“.NextPage”,“.Prev”替换为“.PrevPage”。
更新了I8N信息
move copyright from wexin.html to copyright.html
xtfly/hugo-theme-next中将著作权信息放在wexin widget里,我不想用wexin widget但是想在帖子里显示版权,所以另建layouts/partials/post/copyright.html。
allow empty category or tag
在layouts/partials/post/category.html中将{{ if not (eq (len .Params.categories) 0) }}改为{{ if not .Params.categories}} {{ else }};
在layouts/partials/post/tags.html中将{{ if not (eq (len .Params.tags) 0) }}改为{{ if not .Params.tags}} {{ else }};
这样归类和标签为空时不会抛nil错误。
删除toc设置,对帖子自动显示文章目录
xtfly/hugo-theme-next需要每个Markdown文件都设置toc: true, 我对layouts/partials/sidebar.html和layouts/partials/sidebar/toc.html进行修改,自动显示文章目录
配置
添加next主题
git submodule add https://github.com/mryqu/hugo-theme-next.git themes/next
设置config.toml
baseURL = "https://mryqu.github.io/"
languageCode = "zh-CN"
DefaultContentLanguage = "zh"
title = "Mryqu's Notes"
theme = "next"

[Author]
  DisplayName = "mryqu"
修改Markdown文件
对于Markdown文件,Hexo与Hugo的差异:
- 使用Hexo时,我将图像文件位于content/images目录;使用Hugo后图像文件位于static目录。 可在static目录创建content子目录,然后在content子目录下创建images子目录,然后将Hexo的content/images目录下内容复制到Hugo的static/content/images目录,则原有Markdown文件无需修改。
- 使用Hexo时,每个Markdown文件会生成
/yyyy/MM/dd/<Markdown文件名>这样的页面,而Hugo和mryqu/hugo-theme-next会生成/post/<Markdown文件名处理后的结果>
这个处理见Hugo的helpers/path.go的UnicodeSanitize函数。
Markdown文件对自己网站其他帖子的相对链接必须进行修改。
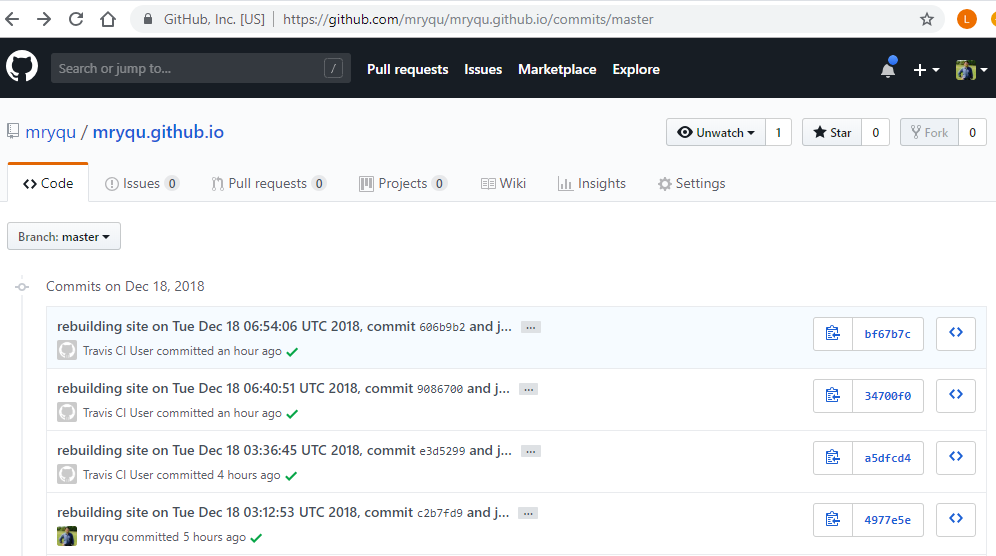
Travis CI自动生成网站
Hugo生成的网站及我自己的Markdown和图像文件将提交到https://github.com/mryqu/mryqu.github.io/ 的hugo分支。下列操作将实现通过Travis CI自动生成静态网页并提交到master分支。
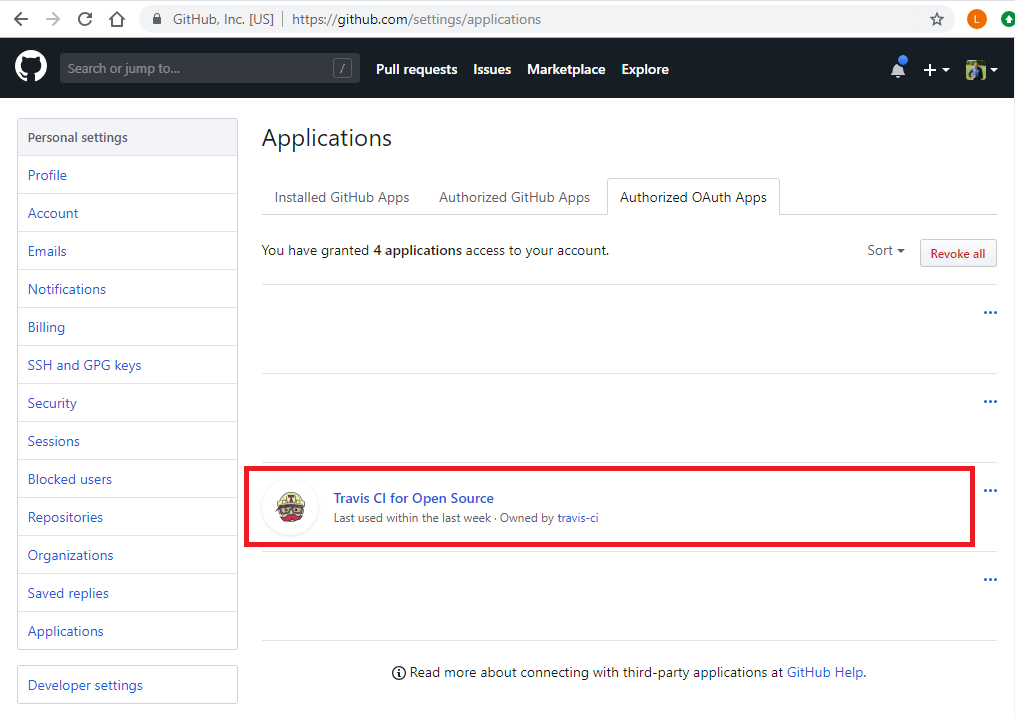
让GitHub通过Travis CI认证
以GitHub身份登陆travis-ci.org,接受Travis CI认证。
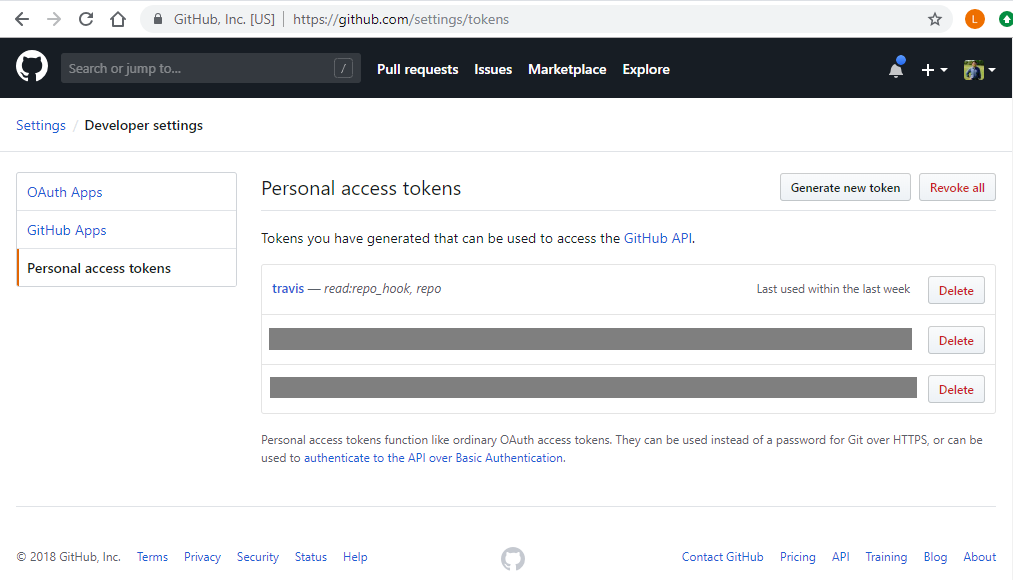
生成GitHub的Personal access token
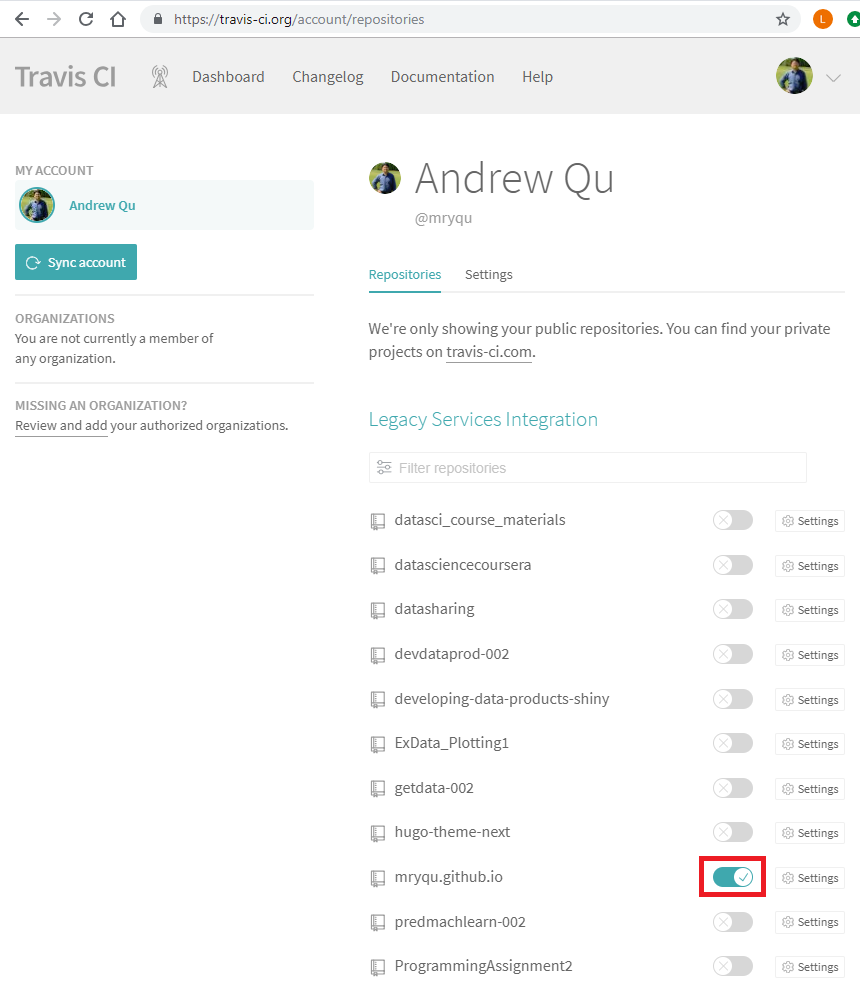
在travis-ci.org 集成mryqu.github.io 项目
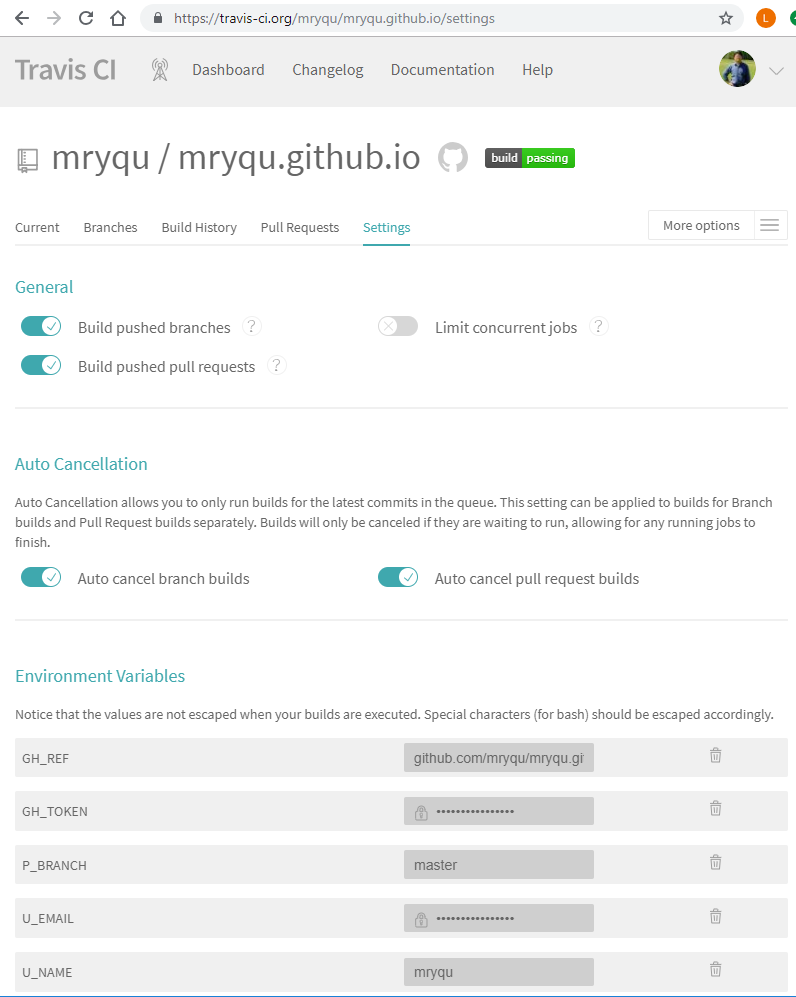
在travis-ci.org 对mryqu/mryqu.github.io进行设置,其中GH_TOKEN为第二步获得的结果。
在https://github.com/mryqu/mryqu.github.io/ 的hugo分支提交.travis.yml
---
git:
  submodules:
    false
before_install:
  - git submodule update --init --recursive

install:
  - wget -O /tmp/hugo.deb https://github.com/gohugoio/hugo/releases/download/v0.52/hugo_0.52_Linux-64bit.deb
  - sudo dpkg -i /tmp/hugo.deb

script:
  - hugo

after_script:
  - rm -rf deployment
  - git clone -b master "https://${GH_TOKEN}@${GH_REF}" deployment
  - rsync -av --delete --exclude ".git" public/ deployment
  - git config user.name "${U_NAME}"
  - git config user.email "${U_EMAIL}"
  - git config --global push.default simple
  - cd deployment
  - git add -A
  - git commit -m "rebuilding site on `date`, commit ${TRAVIS_COMMIT} and job ${TRAVIS_JOB_NUMBER}" || true
  - git push --force --quiet "https://${GH_TOKEN}@${GH_REF}" HEAD:${P_BRANCH}
  - cd ..
  - rm -rf deployment

branches:
  only:
    - hugo
至此,大功告成!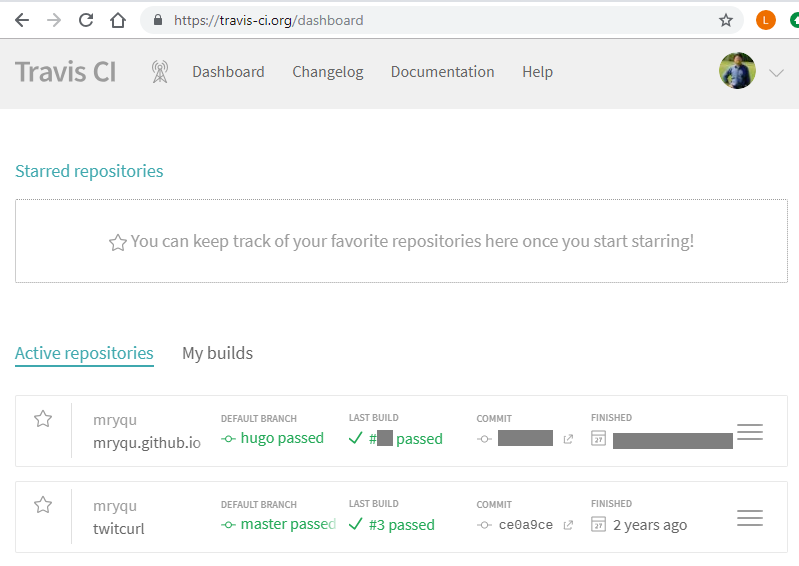
使用Github Actions
最近又想更新博客了,发现免费的travis-ci.org迁移到travis-ci.com后即使有free plan也要用点数。好吧,改用Github Actions了。 在https://github.com/mryqu/mryqu.github.io/ 的hugo分支提交.github/workflows/hugo.yaml,又可以工作了。
# Sample workflow for building and deploying a Hugo site to GitHub Pages
name: Deploy Hugo site to Pages

on:
  # Runs on pushes targeting the default branch
  push:
    branches: ["hugo"]

  # Allows you to run this workflow manually from the Actions tab
  workflow_dispatch:

# Default to bash
defaults:
  run:
    shell: bash

jobs:
  deploy:
    runs-on: ubuntu-latest
    permissions:
      contents: write
    concurrency:
      group: ${{ github.workflow }}-${{ github.ref }}
    steps:
      - name: Checkout
        uses: actions/checkout@v3
        with:
          submodules: true  # Fetch Hugo themes (true OR recursive)
          fetch-depth: 0    # Fetch all history for .GitInfo and .Lastmod

      - name: Setup Hugo
        uses: peaceiris/actions-hugo@v2
        with:
          hugo-version: latest

      - name: Build
        run: hugo --minify

      - name: Deploy
        uses: peaceiris/actions-gh-pages@v3
        if: ${{ github.ref == 'refs/heads/hugo' }}
        with:
          github_token: ${{ secrets.GITHUB_TOKEN }}
          publish_branch: master
          publish_dir: ./public
          commit_message: ${{ github.event.head_commit.message }}
参考
11个最流行的静态(博客)网站生成工具
使用travis-ci自动部署github上的项目
Hugo on GitHub Pages with Travis CI
GitHub Actions for GitHub Pages